Welcome to Code Forum!

Join a community that supports you and your coding journey from day one. We strive to be a friendly, supportive community that empowers everyone to be better developers. By registering with us, you'll be able to discuss, share and private message with other members of our community.

SignUp Now!
  • Guest, before posting your code please take these rules into consideration:
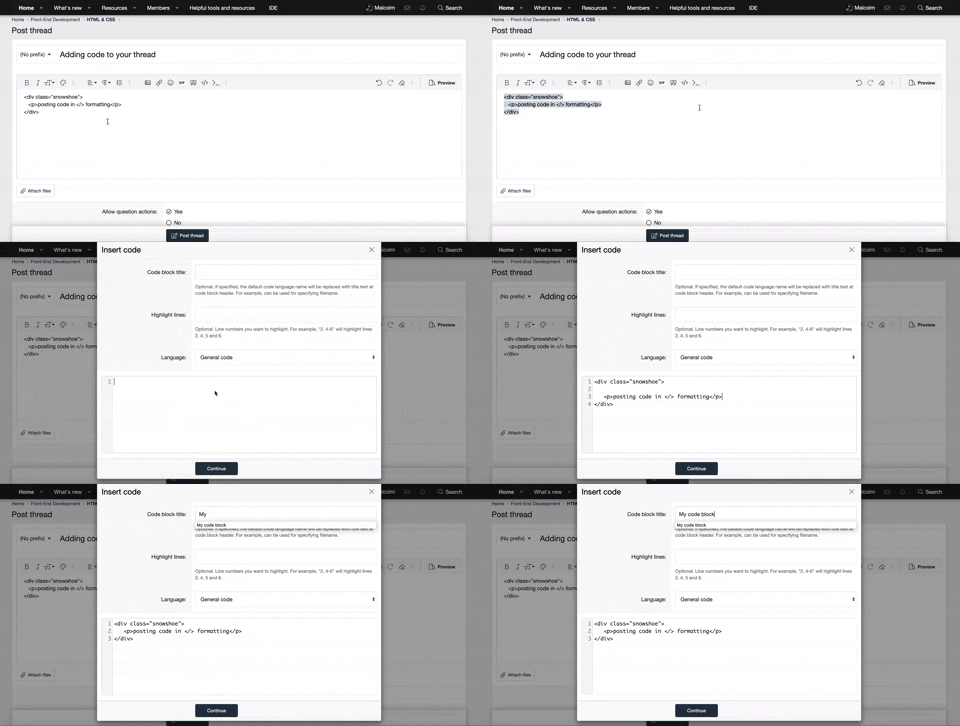
    • It is required to use our BBCode feature to display your code. While within the editor click < / > or >_ and place your code within the BB Code prompt. This helps others with finding a solution by making it easier to read and easier to copy.
    • You can also use markdown to share your code. When using markdown your code will be automatically converted to BBCode. For help with markdown check out the markdown guide.
    • Don't share a wall of code. All we want is the problem area, the code related to your issue.

    GIF shows where to locate </> in the thread and or post editor toolbar.
    To learn more about how to use our BBCode feature, review our "How to post your code into threads" here.

    Thank you, Code Forum.

Help to achieve an protruding background and line dividers for text

Mikeh85

New Coder
Hello all đź‘‹

This is my first time posting (joined today).

To give you an idea of my competency levels, I design Wordpress websites for small businesses using WP Bakery and The7 theme builder. I can inspect CSS and add custom CSS through the CSS editor in my Wordpress sites, but I am at beginner level. I am advancing quickly and enjoying designing and dev. I would like to advance my skillsets predominantly in CSS and other areas of front-end dev. Anyway, nice to meet you all and onto my question.

So, I am building a new homepage here - Home-2 - TMD Brickwork Services.

If you scroll down to the row with the heading 'QUALITY GUARENTEED IN ALL OF OUR SERVICES' you will see 2 rows of banners.

Row 1 contains 2 banners that I have created mostly as an image.
Row 2 contains 1 banner that I have been able to achieve in Wordpress so far utilising a banner element in my theme builder.

Row 1 is just there to show the effect I want to achieve. I don't want the background and divider line above and below text to be part of an image. I would like to create them with CSS. Row 2 contains the banner I am working on.

To confirm, the two areas I cannot achieve are;
  • Protruding Red Background around the Banners (which I am guessing may need some sort of negative padding to achieve the effect I am looking for?)
  • The red line dividers that are sitting above and below the heading text inside each banner.
 
@Mikeh85 You can achieve the protruding red a couple of ways:
1. Using a box shadow with hard edges: box-shadow: -0.5rem -0.25rem red;​
2. Using a pseudo element such as ::after or ::before, but this gets a bit harder as you have to worry about stacking order. I added this to the below.​
​
For the borders above and below the copy, I would use the pseudo elements, myself:

HTML:
<!DOCTYPE html>
<html lang="en">
<head>
    <meta charset="UTF-8">
    <meta name="viewport" content="width=device-width, initial-scale=1.0">
    <title>Document</title>
    <style>
        body{
            display: grid;
            place-content: center;
            height: 100vh;
        }
        div{
            background-color: white;
            width: 500px;
            height: 500px;
            margin-inline: auto;
            outline: 1px solid pink;
            display: flex;
            justify-content: center;
            align-items: center;
            position: relative;
            &::after{
                background-color: red; /* adjust as needed */
                content:''; /* needed for the element to render */
                display: block;
                margin-inline: auto;
                position: absolute;
                width: 100%;
                height: 100%;
                left: -20px;
                top: -10px;
                z-index: -1;
            }
        }
        h1{
            position: relative;
            text-align: center;
            padding-block-start: 50px;
            padding-block-end: 50px;
            margin: 0;
            &::before{
                background-color: red; /* adjust as needed */
                content:''; /* needed for the element to render */
                display: block;
                margin-inline: auto;
                position: absolute;
                width: 80%; /* adjust as needed */
                height: 2px; /* adjust as needed for rule thickness */
                right: 0;
                left: 0;
                top: 0;
            }
            &::after{
                background-color: red; /* adjust as needed */
                content:''; /* needed for the element to render */
                display: block;
                margin-inline: auto;
                position: absolute;
                width: 80%; /* adjust as needed */
                height: 2px; /* adjust as needed for rule thickness */
                right: 0;
                left: 0;
                bottom: 0;
            }
        }
    </style>
</head>
<body>
    <div><h1>This is my headline</h1></div>
</body>
</html>
 
Last edited:
Hi Tom. Thank you greatly for your detailed response.

I managed to follow the box shadow instructions and get that working - awesome! So satisfying 🙂

The HTML for the dividing lines above and below is a bit more tricky for me with my lack of HTML knowledge so I may need to getting my learning hat on for HTML school before attempting that part.
 
Hi Tom. Thank you greatly for your detailed response.

I managed to follow the box shadow instructions and get that working - awesome! So satisfying 🙂

The HTML for the dividing lines above and below is a bit more tricky for me with my lack of HTML knowledge so I may need to getting my learning hat on for HTML school before attempting that part.

Hello Mike,

I apologize if I made this more difficult to follow. I did some things out of habit. For example (and forgive if you know this already), I used CSS nesting in the code sample, where I used the &::after etc. In the case of the h1, these two things are the same:

CSS:
h1{
    position: relative;
    text-align: center;
    padding-block-start: 50px;
    padding-block-end: 50px;
    margin: 0;

    &::before{
        background-color: red; /* adjust as needed */
        content:''; /* needed for the element to render */
        display: block;
        margin-inline: auto;
        position: absolute;
        width: 80%; /* adjust as needed */
        height: 2px; /* adjust as needed for rule thickness */
        right: 0;
        left: 0;
        top: 0;
    }
}

h1{
    position: relative;
    text-align: center;
    padding-block-start: 50px;
    padding-block-end: 50px;
    margin: 0;
}

h1::before{
    background-color: red; /* adjust as needed */
    content:''; /* needed for the element to render */
    display: block;
    margin-inline: auto;
    position: absolute;
    width: 80%; /* adjust as needed */
    height: 2px; /* adjust as needed for rule thickness */
    right: 0;
    left: 0;
    top: 0;
}

The & allows me to nest related things which helps in code clarity and organization.

Let me know if I can help with anything else.
 
Back
Top Bottom